- Details
- Kunden-Tipp
Produktbeschreibung
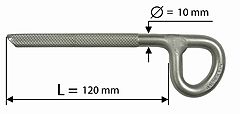
Der kleinste und leichteste Edelstahl-Verbundmцrtelhaken mit der Spezialriffelung von Raumerwelcher eine дhnliche Bauart wie die Superstar-Serie aufweist!
Der geriffelte Abschnitt ist 50 mm lang und bietet erhцhten Widerstand bei Zugbelastung.Die Abmessungen sind kleiner als bei der Superstar-Serie von Raumer und die Oberflдche isthellgrau matt und ist damit die am wenigsten sichtbare Hakenfarbe.Dieser Anker spart auch Verbundmцrtel da das Bohrloch mit 9mm x 80mm gebohrt werden darf.(Normalerweise wird ein Ш10 mm Bohrloch verwendet, aber so oder so die Haltewerte desHakens bleiben unverдndert). Das Bohren eines kleinen 9 mm Loch spart zudem Batterieleistungder Bohrmaschine; zudem ist dieser Haken sehr klein und kostengьnstig.
Seit 2013 verwendet Raumer den neuen Edelstahl AISI 316L anstatt dem AISI 304. Das neue Material hat vor allem Vorteile in der Korrosionsbestдndigkeit in Meernдhe. Zusдtzlich bietet Raumer einige Artikel mit dem neuen AISI 316L in einer noch hochwertigeren Marine-Linie an, welche durch zusдtzliche thermische und chemische Behandlung weitere Verbesserung in der Korrosionsbestдndigkeit erhдlt.
Details:
+ Einsatzbereich: Sportklettern, Alpines Klettern, Eisklettern
+ Haltewerte: 27 kN
+ Rt: 27 kN
+ Ra: 27 kN
+ Materialdruchmesser: 8 mm
+ Gewicht: 75 g
+ Material: Edelstahl 316L
+ Made in Italy
The smallest in the resin anchor range and currently the only 8mm model on the market.
The shank length is 80mm and the knurled section is 50mm long giving this anchor the maximum resin hold on the market. The dimensions are smaller and the surface is a pale matt grey, making it the least visible resin anchor. This anchor also saves on resin as the drill hole must only be 9mm x 80mm. (Usually a Ш10 mm hole is used but either way the anchor’s resistance remains unchanged). Drilling a 9mm hole also saves the drill's battery power. Last but not least, this anchor is also very cost-effective.
IMPORTANT NOTE: From 2013 the material used in the majority of our anchors is now stainless steel AISI 316L, which offers a higher resistance to marine corrosion than the former AISI 304. To highlight this change each article is stamped with the relevant symbols.
Attention: There is also a “Marina” version of this anchor which is highly resistant to saline corrosion. To mark the difference between stainless steel AISI 316L and the marina version of the same material, all marine-suitable anchors have been marked with a fish symbol and the initials “INOX".We recommend reading the attached PDF document for a detailed explanation of the problems presented by marine corrosion.
Details:
+ Strength: 27 kN
+ Rt = 27 kN
+ Ra = 27 kN
+ Weight: 75 g
+ Material: 316L stainless steel
+ Made in Italy
INSTRUCTIONS FOR CORRECT PLACEMENT OF RAUMER RESIN ANCHORS:
Placing anchors using a resin glue is a simple but delicate process. If not executed correctly, resistance to tensile and shear force can be seriously compromised.
There are two recommended types of resin glue:
A) BICOMPONENT EPOXY RESIN PACKAGED IN CARTRIDGES.
B) SYNTHETIC ACYRLATE RESIN PREDOSED IN GLASS PHIALS.
Instructions for each system are as follows:
Method A
1) Choose an undamaged and solid area of rock away from edges.
2) Strike the surface with a hammer to determine the rock consistency.
3) Drill a hole perpendicular to the placement surface. (Please note: the hole must be 2mm wider than the shank diameter). The depth should be no more than 5mm longer than the anchor shank to reduce resin waste. To optimise placement, it is (almost) always recommended to also make a groove in line with the desired load. To do this, hold the drill perpendicularly to the surface and make a 1cm-deep hole 3.5cm from the centre axis of the upper hole, in line with the directional force. Now position the drill at a 45° angle and, beginning from the hole just created, make a 6-10mm deep groove to join with the upper hole. Clean well and test by inserting a “Superstar” eyebolt into the hole. The anchor must be positioned correctly inside the groove. When the resin is applied, this ensures perfect and permanent placement which is unaffected by vibrations and transversal force. Use the drill to make any necessary adjustments.
4) Clean the hole either with an appropriate pump or by blowing down a rubber tube. A pipe-cleaner is also recommended to completely remove any dust from inside the hole.
5) Using an injector gun, inject the correct amount of resin into the base of the hole and along the groove.
6) Insert the anchor to a point about 1cm from the base and twist in semicircles to coat the surface of the shank completely in resin. Now insert the “Superstar” fully into the groove. A small amount of resin may exit from the hole edges and around the eye, demonstrating a good fit. Use latex gloves throughout this procedure. Remove any excess resin from the edges of the eyelet, sealing the edges. This is important to prevent water from entering in the future. This is particularly important in marine environments.
7) When using this anchor to protect overhangs or roofs, use the same process as above but do not create the groove. Once the anchor is in place, hold it in position using a couple of cocktail sticks (or similar…) between the edge of the hole and the shank's surface. Without this the anchor has a tendency to fall out of the vertical hole. Once the resin has hardened the two sticks can be easily removed.
8) After applying the resin do not touch the anchor. Leave to set for at least 24 hours – if possible for 2/3 days, depending on ambient temperature. Respect any advice given by the resin's manufacturer.
Method B
As for method A up to and including step 4. However for obvious reasons, this system can not use the groove method as described above. Instead, as soon as the hole has been drilled and cleaned, continue as follows:
1) Take a phial of synthetic resin and hold for a few sections; the hand temperature should loosen the resin and make it settle on the bottom. Insert the phial into the cleaned hole, ensuring that any air contained within the phial faces out.
2) Insert the anchor into the hole with the phial and break this using a hammer. Strike the head of the anchor hard, turning it at least ten times to coat the surface fully. It is very important to execute this process accurately as the internal catalyst container within the phial itself must break and mix completely with the resin. Without this synthetic resin is ineffective. Note: the process described above is difficult as the presence of the phial within the hole causes substantial resistance when attempting to insert the anchor. To remedy this, RAUMER has designed a small attachment (art.302) to be used with SDS Plus drills which allows for perfect and rapid anchor placement without excessive effort.
3) Turn the eyebolt to face the directional force and wait at least 24 hours before use.
IMPORTANT NOTE: Resin placement using method B has some obvious benefits in terms of convenience and practicality. However the quality, strength and durability factors are far from equal to bicomponent epoxy resin, which we recommend for almost all situations. Either way, to ensure a high quality placement we highly recommend using fresh resin which has recently been produced and has a long expiry date.
Kunden, die diesen Artikel kauften, haben auch folgende Artikel bestellt:
Diesen Artikel haben wir am 04.11.2015 in unseren Katalog aufgenommen.


